2. prtecan Tutorial#
This tutorial demonstrates how to process Tecan plate reader data using the clophfit.prtecan module.
What you’ll learn:
Tecan file structure and label blocks
Building titrations from multiple files (manually and from list file)
Setting plate scheme, loading additions, background handling
Inspecting and plotting results
Brief overview of fitting methods and quality control
# Setup
%load_ext autoreload
%autoreload 2

from pathlib import Path

import arviz as az
import matplotlib.pyplot as plt
import numpy as np

%matplotlib inline

from clophfit import prtecan

# Point to the tests data directory shipped with the repo
data_root = Path("../../tests/Tecan")
l1_dir = data_root / "L1"
l2_dir = data_root / "140220"  # second dataset used by the original tutorial
l4_dir = data_root / "L4"
2.1. Understanding Tecan file structure#
Each Tecan file contains global metadata and one or more label blocks (measurement blocks). Blocks with identical key metadata are equivalent; blocks differing only by Integration Time, Flashes, or Gain are almost equivalent after normalization.
# Load a single Tecan file and inspect label blocks
tf = prtecan.Tecanfile(l1_dir / "290513_7.2.xls")
lb1, lb2 = tf.labelblocks["1"], tf.labelblocks["2"]
print("Available label blocks:", list(tf.labelblocks.keys()))
lb1.metadata
Available label blocks: ['1', '2']
{'Label': Metadata(value='Label1', unit=None),
 'Mode': Metadata(value='Fluorescence Top Reading', unit=None),
 'Excitation Wavelength': Metadata(value=400, unit=['nm']),
 'Emission Wavelength': Metadata(value=535, unit=['nm']),
 'Excitation Bandwidth': Metadata(value=20, unit=['nm']),
 'Emission Bandwidth': Metadata(value=25, unit=['nm']),
 'Gain': Metadata(value=94, unit=['Manual']),
 'Number of Flashes': Metadata(value=10, unit=None),
 'Integration Time': Metadata(value=20, unit=['µs']),
 'Lag Time': Metadata(value='µs', unit=None),
 'Settle Time': Metadata(value='ms', unit=None),
 'Start Time:': Metadata(value='29/05/2013 12.28.10', unit=None),
 'Temperature': Metadata(value=24.9, unit=['°C']),
 'End Time:': Metadata(value='29/05/2013 12.28.50', unit=None)}
print("\nSample Data (A01-B06):")
print({k: v for i, (k, v) in enumerate(lb2.data.items()) if i < 18})
Sample Data (A01-B06):
{'A01': 8761.0, 'A02': 15316.0, 'A03': 14346.0, 'A04': 8474.0, 'A05': 16319.0, 'A06': 10912.0, 'A07': 10855.0, 'A08': 12565.0, 'A09': 16695.0, 'A10': 12125.0, 'A11': 10895.0, 'A12': 36597.0, 'B01': 10280.0, 'B02': 11124.0, 'B03': 19612.0, 'B04': 10109.0, 'B05': 11239.0, 'B06': 8556.0}
Load additional files to compare block equivalence and demonstrate normalization across Gain differences.
tf1 = prtecan.Tecanfile(l1_dir / "290513_5.5.xls")  # two equivalent blocks
tf2 = prtecan.Tecanfile(
    l1_dir / "290513_8.8.xls"
)  # one equivalent, one almost equivalent

print("tf.lb1 = tf2.lb1 (strict):", lb1 == tf2.labelblocks["1"])
print("tf.lb2 = tf2.lb2 (strict):", lb2 == tf2.labelblocks["2"])
print("tf.lb2 ~ tf2.lb2 (almost):", lb2.almost_equal(tf2.labelblocks["2"]))
tf.lb1 = tf2.lb1 (strict): True
tf.lb2 = tf2.lb2 (strict): False
tf.lb2 ~ tf2.lb2 (almost): True
2.2. Grouping files: manual and convenience constructor#
You can group equivalent blocks across files either via TecanfilesGroup or by constructing a Titration directly.
# Manual grouping
tfg = prtecan.TecanfilesGroup([tf2, tf, tf1])
lbg1 = tfg.labelblocksgroups["1"]
print("Well A01 raw:", lbg1.data["A01"])
print("Well A01 normalized:", lbg1.data_nrm["A01"])

# Same using Titration with explicit x (e.g., pH values)
tit_manual = prtecan.Titration([tf2, tf, tf1], x=np.array([8.8, 7.2, 5.5]), is_ph=True)
print(tit_manual)
print(
    "A01 normalized via Titration:", tit_manual.labelblocksgroups["1"].data_nrm["A01"]
)
tit_manual.labelblocksgroups == tfg.labelblocksgroups
Well A01 raw: [17123.0, 17088.0, 18713.0]
Well A01 normalized: [910.7978723404256, 908.936170212766, 995.3723404255319]
Titration
	files=["../../tests/Tecan/L1/290513_8.8.xls", ...],
	x=[np.float64(8.8), np.float64(7.2), np.float64(5.5)],
	x_err=[],
	labels=dict_keys(['1', '2']),
	params=TitrationConfig(bg=True, bg_adj=False, dil=True, nrm=True, bg_mth='mean', fit_method='huber', outlier=None, noise_alpha=(), noise_gain=(), mask_outliers=False, outlier_threshold=0.2)	pH=True	additions=[]
	scheme=PlateScheme(file=None, _buffer=[], _discard=[], _ctrl=[], _names={}))
A01 normalized via Titration: [910.7978723404256, 908.936170212766, 995.3723404255319]
True
2.3. Build a titration from a list file#
Using a list file is convenient and less error-prone. The example list/plate files are in tests/Tecan/L1.
tit = prtecan.Titration.fromlistfile(l1_dir / "list.pH.csv", is_ph=True)
print("x values (e.g., pH):", tit.x)
lbg1 = tit.labelblocksgroups["1"]
lbg2 = tit.labelblocksgroups["2"]
print(
    "Temperature in labelblocksgroup 2:",
    [lb.metadata.get("Temperature").value for lb in lbg2.labelblocks],
    lbg2.labelblocks[5].metadata.get("Temperature").unit[0],
)
(lbg1.metadata, lbg2.metadata)
x values (e.g., pH): [8.9  8.3  7.7  7.05 6.55 6.   5.5 ]
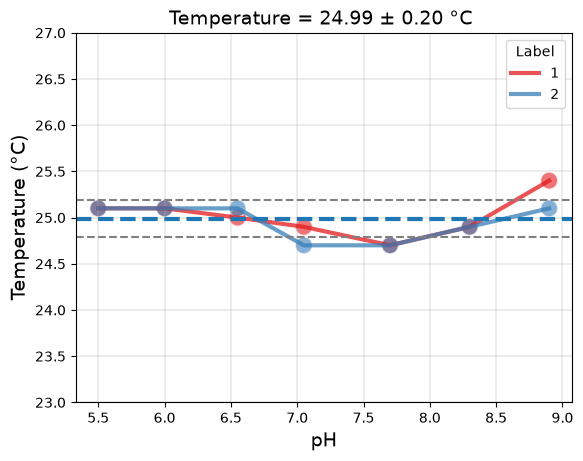
Temperature in labelblocksgroup 2: [25.1, 24.9, 24.7, 24.7, 25.1, 25.1, 25.1] °C
({'Label': Metadata(value='Label1', unit=None),
  'Mode': Metadata(value='Fluorescence Top Reading', unit=None),
  'Excitation Wavelength': Metadata(value=400, unit=['nm']),
  'Emission Wavelength': Metadata(value=535, unit=['nm']),
  'Excitation Bandwidth': Metadata(value=20, unit=['nm']),
  'Emission Bandwidth': Metadata(value=25, unit=['nm']),
  'Number of Flashes': Metadata(value=10, unit=None),
  'Integration Time': Metadata(value=20, unit=['µs']),
  'Lag Time': Metadata(value='µs', unit=None),
  'Settle Time': Metadata(value='ms', unit=None),
  'Gain': Metadata(value=94, unit=None)},
 {'Label': Metadata(value='Label2', unit=None),
  'Mode': Metadata(value='Fluorescence Top Reading', unit=None),
  'Excitation Wavelength': Metadata(value=485, unit=['nm']),
  'Emission Wavelength': Metadata(value=535, unit=['nm']),
  'Excitation Bandwidth': Metadata(value=25, unit=['nm']),
  'Emission Bandwidth': Metadata(value=25, unit=['nm']),
  'Number of Flashes': Metadata(value=10, unit=None),
  'Integration Time': Metadata(value=20, unit=['µs']),
  'Lag Time': Metadata(value='µs', unit=None),
  'Settle Time': Metadata(value='ms', unit=None),
  'Movement': Metadata(value='Move Plate Out', unit=None)})
Within each label-block group, normalized data (by Gain, Flashes, Integration Time) are readily available. In the case of not fully identical labelblock metadata non-normalized data might not exist (empty dict {}).
# Inspect raw vs normalized for a sample well
well = "H03"
(lbg1.data[well], lbg2.data, lbg1.data_nrm[well], lbg2.data_nrm[well])
([27593.0, 26956.0, 26408.0, 26815.0, 28308.0, 30227.0, 30640.0],
 {},
 [1467.712765957447,
  1433.8297872340427,
  1404.6808510638298,
  1426.3297872340427,
  1505.7446808510638,
  1607.8191489361702,
  1629.787234042553],
 [1456.2121212121212,
  1363.9285714285716,
  1310.357142857143,
  1214.5408163265306,
  1200.9693877551022,
  1224.642857142857,
  1193.8265306122448])
2.4. Load plate scheme and additions#
The plate scheme defines buffer and control wells; additions define dilution steps.
After loading these, the processed tit.data[...] arrays reflect background subtraction and optional dilution correction, depending on tit.params.
# Load plate scheme and additions (kept to L1 files for consistency)
tit.load_scheme(l1_dir / "scheme.txt")
print(
    f"Titration with {len(tit.tecanfiles)} files and {len(tit.labelblocksgroups)} label groups"
)
print("Buffer wells:", tit.scheme.buffer)
print("Control wells:", tit.scheme.ctrl)
print("Named groups:", tit.scheme.names)

tit.load_additions(l1_dir / "additions.pH")
print("Additions:", tit.additions)
tit.params.bg_adj = False
tit.params.bg_mth = "meansd"
print("Titration Params:", tit.params)
# Example: compare values in data vs normalized groups (after scheme/additions)
(lbg1.data["H12"], tit.data["1"]["H12"], lbg1.data_nrm["H12"], tit.bg["1"])
Titration with 7 files and 2 label groups
Buffer wells: ['C12', 'D01', 'D12', 'E01', 'E12', 'F01']
Control wells: ['H01', 'F12', 'B01', 'B12', 'G01', 'C01', 'A12']
Named groups: {'E2GFP': {'B12', 'G01', 'C01', 'F12'}, 'V224L': {'H01', 'A12'}, 'V224Q': {'B01'}}
Additions: [100, 2, 2, 2, 2, 2, 2]
Titration Params: TitrationConfig(bg=True, bg_adj=False, dil=True, nrm=True, bg_mth='meansd', fit_method='huber', outlier=None, noise_alpha=(), noise_gain=(), mask_outliers=False, outlier_threshold=0.2)
([28309.0, 27837.0, 26511.0, 25771.0, 27048.0, 27794.0, 28596.0],
 array([302.45567376, 321.23670213, 313.92695035, 277.94929078,
        353.65212766, 335.1001773 , 316.34042553]),
 [1505.7978723404256,
  1480.6914893617022,
  1410.159574468085,
  1370.7978723404256,
  1438.723404255319,
  1478.404255319149,
  1521.063829787234],
 array([1203.34219858, 1165.7535461 , 1108.30673759, 1108.58156028,
        1111.2677305 , 1173.7677305 , 1238.61702128]))
Background handling summary:
labelblocksgroups[:].data: unchanged raw block data
labelblocksgroups[:].data_buffersubtracted: background-subtracted
tit.data: background-subtracted and dilution-corrected (if enabled)
The order in which you apply dilution correction and plate scheme can impact your intermediate results, even though the final results might be the same.
Dilution correction adjusts the measured data to account for any dilutions made during sample preparation. This typically involves multiplying the measured values by the dilution factor to estimate the true concentration of the sample.

A plate scheme describes the layout of the samples on a plate (common in laboratory experiments, such as those involving microtiter plates). The plate scheme may involve rearranging or grouping the data in some way based on the physical location of the samples on the plate.
# Demonstrate changing background wells and seeing bg estimate
import copy

tit2 = copy.deepcopy(tit)
tit2.params.bg = True
tit2.buffer.wells = ["D01", "E01"]
tit.bg, tit2.bg
({'1': array([1203.34219858, 1165.7535461 , 1108.30673759, 1108.58156028,
         1111.2677305 , 1173.7677305 , 1238.61702128]),
  '2': array([505.62289562, 467.14285714, 473.48639456, 500.29761905,
         524.3622449 , 584.3452381 , 581.8962585 ])},
 {'1': array([1016.62234043,  971.56914894,  937.9787234 ,  951.38297872,
          985.74468085, 1005.26595745, 1070.85106383]),
  '2': array([420.05050505, 364.69387755, 382.5255102 , 402.19387755,
         430.84183673, 455.07653061, 466.19897959])})
2.5. Quick look at fitting and results#
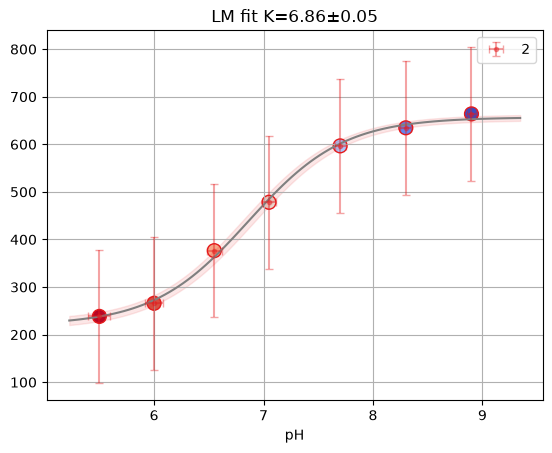
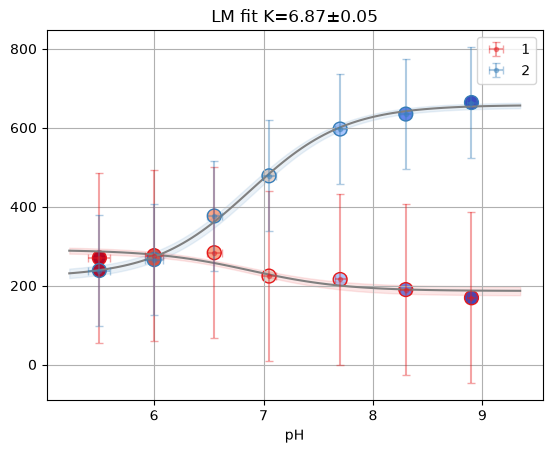
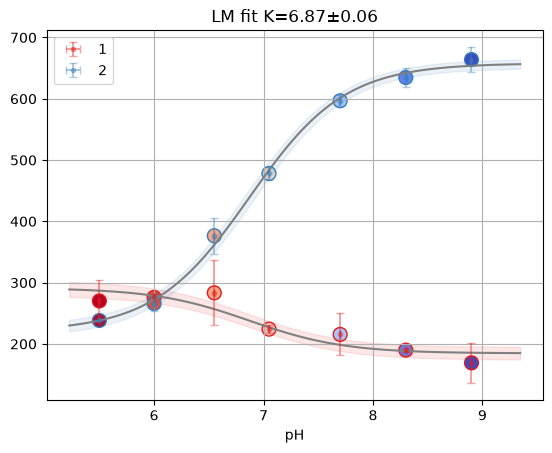
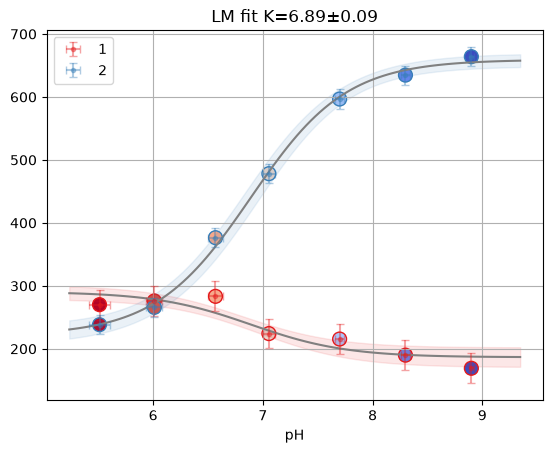
The tit.results container provides per-label fits; tit.result_global combines multiple labels.
Below we only preview access/plotting. For advanced Bayesian/ODR methods, see the dedicated section.
tit.bg_err
{'1': array([85.42617933, 85.42617933, 85.42617933, 85.42617933, 85.42617933,
        85.42617933, 85.42617933]),
 '2': array([54.27412064, 54.27412064, 54.27412064, 54.27412064, 54.27412064,
        54.27412064, 54.27412064])}
# Fit each label and the global dataset; plate metadata comes from the titration
tr1 = tit.fit_plate(label="1", method="lm")
tr2 = tit.fit_plate(label="2", method="lm")
tr_glob = tit.fit_plate(method="lm")
tr_odr = tit.fit_plate(method="odr")

# Access result objects and figures
well = "D10"
single1 = tr1[well]
single2 = tr2[well]
glob = tr_glob[well]
odr = tr_odr[well]

# Display figures inline
print(f"Reduced X2: {single2.result.redchi:.3f}")
single2.figure
Reduced X2: 0.006
print(f"Reduced X2: {glob.result.redchi:.3f}")
glob.figure
Reduced X2: 0.006
print(f"Reduced X2: {odr.odr.sum_square:.3f}")
odr.figure
Reduced X2: 0.000
tr1.dataframe.head()
| K | sK | Khdi03 | Khdi97 | S0_1 | sS0_1 | S0_1hdi03 | S0_1hdi97 | S1_1 | sS1_1 | S1_1hdi03 | S1_1hdi97 | |
|---|---|---|---|---|---|---|---|---|---|---|---|---|
| well | ||||||||||||
| A02 | 8.274542 | 0.245625 | 3 | 11 | -191.443632 | 23.499922 | -inf | inf | -61.883570 | 6.005122 | -inf | inf |
| A03 | 8.360129 | 0.591549 | 3 | 11 | -139.134032 | 36.276847 | -inf | inf | -61.218428 | 7.923119 | -inf | inf |
| A04 | 8.658066 | 0.801715 | 3 | 11 | -159.196731 | 80.445020 | -inf | inf | -59.099618 | 8.767690 | -inf | inf |
| A05 | 7.341777 | 0.170989 | 3 | 11 | 38.356158 | 11.168277 | -inf | inf | 192.793354 | 9.308983 | -inf | inf |
| A06 | 8.613653 | 1.275045 | 3 | 11 | -69.258845 | 62.822460 | -inf | inf | -18.203824 | 7.723070 | -inf | inf |
# Only fit D10 to avoid computing MCMC for the entire plate
ds_mcmc = {"D10": tit.create_global_ds("D10")}
tr_mcmc = tit.fit_plate(ds_mcmc, method="mcmc")

fr_mcmc = tr_mcmc[well]
fr_mcmc.mini
NUTS[nutpie]: [K, S0_1, S1_1, S0_2, S1_2, x_start, x_step, ye_mag_1, ye_mag_2]
# Multi MCMC is out of scope for this pipeline API
fr_mcmc.figure
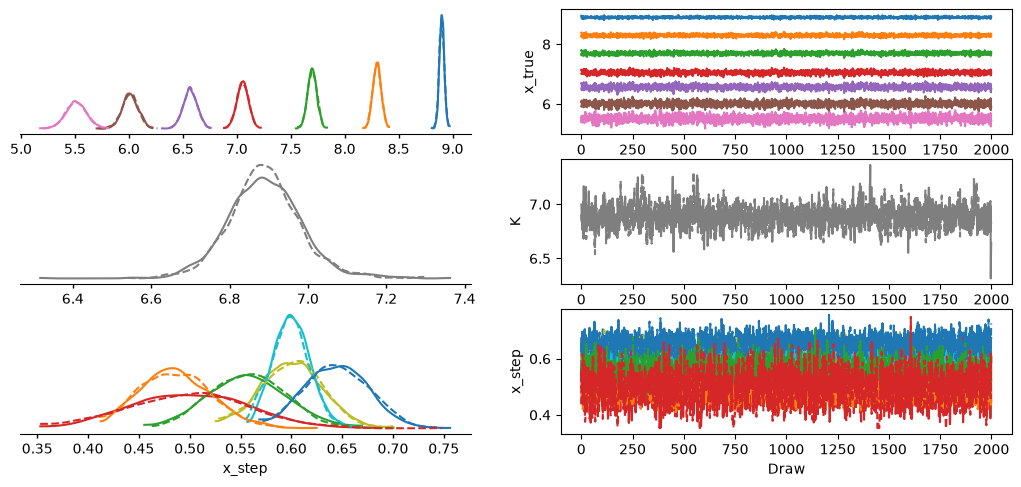
az.plot_trace_dist(fr_mcmc.trace, var_names=["x_true", "K", "x_step"])
<arviz_plots.plot_collection.PlotCollection at 0x7f78de499be0>
# 5.1 Bayesian fitting with PyMC
result_mcmc = tr_mcmc[well]

print("MCMC Results:")
print(f"Kd: {result_mcmc.result.params['K'].value:.2f}")
print(
    f"95% HDI: [{result_mcmc.result.params['K'].min:.2f}, {result_mcmc.result.params['K'].max:.2f}]"
)
MCMC Results:
Kd: 6.89
95% HDI: [-inf, inf]
2.6. Quality control and utilities#
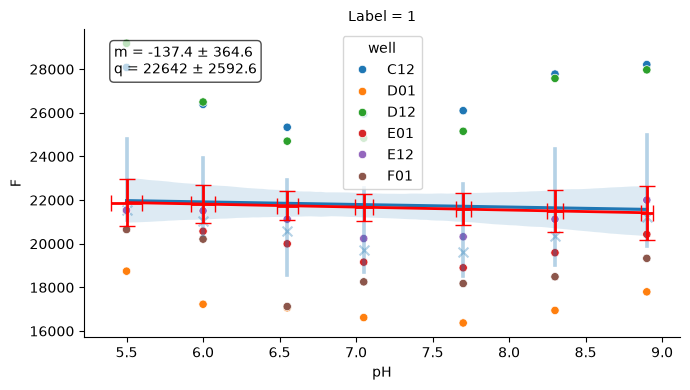
A few helper plots are useful to quickly assess experiment consistency (buffer, temperature).
# Buffer plot
buf_plot = tit.buffer.plot(nrm=False)
buf_plot.figure
# Temperature plot
temp_plot = tit.plot_temperature()
temp_plot
2.7. Quality control: flagging bad wells#
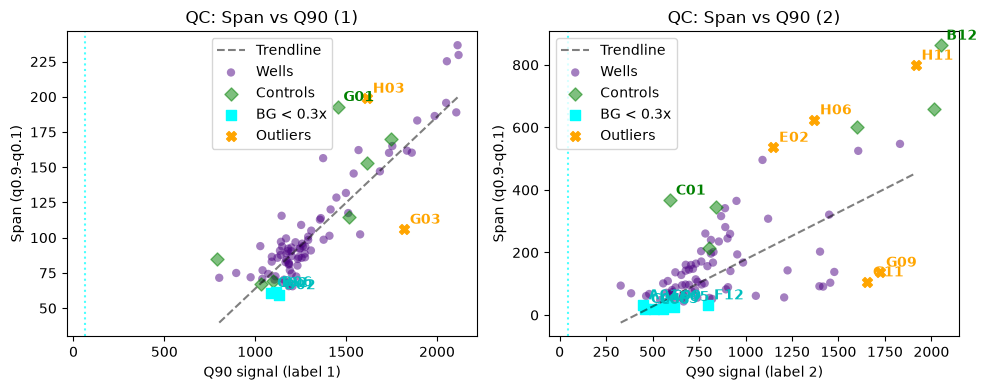
Titrations often contain flat or dead wells (pipetting errors, missing
fluorophore). plot_qc_span_vs_center_titration plots each well’s dynamic
range (inter-quantile span) against a robust signal amplitude (the q90
quantile), fits a robust Theil–Sen trend over the sample wells, and flags
wells below that trend or a background floor. Buffer wells are excluded;
control wells are shown for reference (named when they sit off the trend) but
never flagged by the trend criterion — only by the background floor.
qc_flag_bad_wells_titration returns the flagged wells without mutating
the titration; Titration.detect_and_discard_bad_wells applies the discard
in place.
This example L1 plate is mostly background/buffer wells, so most wells are legitimately flagged — that is why the fitting cells above pick specific wells such as
D10.
from clophfit.fitting import plotting

# Non-mutating QC: flagged wells per label, or one combined set across labels.
bad = plotting.qc_flag_bad_wells_titration(
    tit, z_threshold=8, bg_multiplier=0.5, combine="intersection"
)
print(f"QC flags {len(bad)} wells (bad in every label)")
g = plotting.plot_qc_span_vs_center_titration(tit, z_threshold=4, bg_multiplier=0.3)
QC flags 17 wells (bad in every label)
import copy

# detect_and_discard_bad_wells mutates the titration (updates scheme.discard
# and clears cached results); preview on a copy to keep the tutorial intact.
preview = copy.deepcopy(tit)
discarded = preview.detect_and_discard_bad_wells()
print(
    f"detect_and_discard would drop {len(discarded)} wells, "
    f"e.g. {sorted(discarded)[:8]}"
)
detect_and_discard would drop 67 wells, e.g. ['A02', 'A03', 'A04', 'A05', 'A06', 'A07', 'A08', 'A09']
2.8. Residual diagnostics#
Every fit — LMFit, ODR, or PyMC — exposes a canonical residual table via
fr.residuals (columns label, x, y, yhat, sigma, raw_res, std_res, …).
ResidualDiagnostics packages the common residual audits, with structural
analyses (per-label bias, covariance, correlation) grouped under .analysis.
fr = tr_glob["D10"]
# One schema regardless of the fitter that produced it:
fr.residuals[["label", "x", "y", "yhat", "sigma", "std_res"]].head()
| label | x | y | yhat | sigma | std_res | |
|---|---|---|---|---|---|---|
| 0 | 1 | 8.90 | 169.104610 | 187.455418 | 216.245881 | -0.084861 |
| 1 | 1 | 8.30 | 189.938830 | 190.252562 | 216.245881 | -0.001451 |
| 2 | 1 | 7.70 | 215.514184 | 200.032395 | 216.245881 | 0.071593 |
| 3 | 1 | 7.05 | 224.159929 | 228.210144 | 216.245881 | -0.018730 |
| 4 | 1 | 6.55 | 283.337234 | 257.224246 | 216.245881 | 0.120756 |
from clophfit.fitting.model_validation import ResidualDiagnostics

diag = ResidualDiagnostics(tr_glob.residuals)
diag.normality()
/home/runner/work/ClopHfit/ClopHfit/src/clophfit/fitting/model_validation.py:709: FutureWarning: As of SciPy 1.17, users must choose a p-value calculation method by providing the `method` parameter. `method='interpolate'` interpolates the p-value from pre-calculated tables; `method` may also be an instance of `MonteCarloMethod` to approximate the p-value via Monte Carlo simulation. When `method` is specified, the result object will include a `pvalue` attribute and not attributes `critical_value`, `significance_level`, or `fit_result`. Beginning in 1.19.0, these other attributes will no longer be available, and a p-value will always be computed according to one of the available `method` options.
  row["anderson_A2"] = float(sp_stats.anderson(x, dist="norm").statistic)
| group | n | shapiro_W | shapiro_p | dagostino_K2 | dagostino_p | anderson_A2 | |
|---|---|---|---|---|---|---|---|
| 0 | label_1 | 609 | 0.996314 | 1.701315e-01 | 6.878660 | 3.208617e-02 | 0.392601 |
| 1 | label_2 | 609 | 0.934506 | 1.086438e-15 | 78.449416 | 9.224139e-18 | 7.168227 |
| 2 | pooled | 1218 | 0.979094 | 2.861579e-12 | 70.134831 | 5.894066e-16 | 4.516970 |
# Structural analyses live under `.analysis` (here: systematic bias per label).
diag.analysis.label_bias()[1]
| mean_resid | std_resid | median_resid | outlier_rate | negative_bias_frac | |
|---|---|---|---|---|---|
| label | |||||
| 1 | 4.264886e-08 | 1.062883 | 0.044974 | 0.011494 | 0.307061 |
| 2 | -4.264886e-08 | 0.933769 | -0.008027 | 0.013136 | 0.247947 |
import pandas as pd
import seaborn as sns

df1 = pd.read_csv(l2_dir / "fit1-1.csv", index_col=0)
# merged_df = tit.result_dfs["1"][["K", "sK"]].merge(df1, left_index=True, right_index=True)
merged_df = tr_glob.dataframe[["K", "sK"]].merge(df1, left_index=True, right_index=True)

sns.jointplot(merged_df, x="K_y", y="K_x", ratio=3, space=0.4)
<seaborn.axisgrid.JointGrid at 0x7f78a1ecde80>
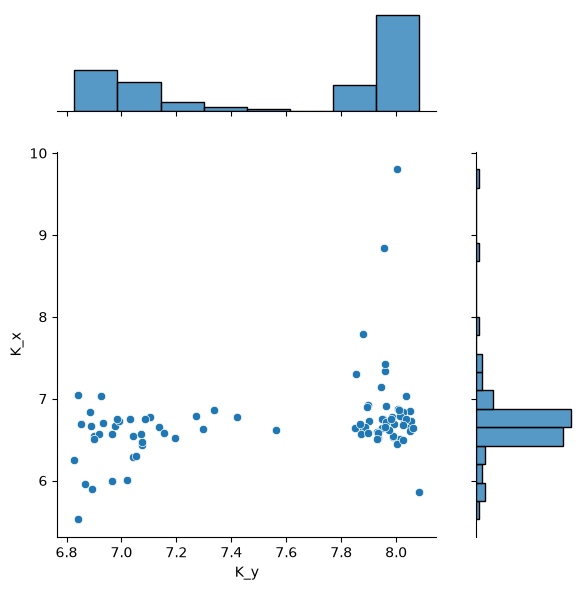
If a fit fails in a well, the well key will be anyway present in results list of dict.
2.8.1. Posterior#
import os

from clophfit.fitting import plotting

np.random.seed(0)  # ruff: ignore[numpy-legacy-random]
remcee = glob.mini.emcee(
    burn=100,
    steps=2000,
    workers=int(os.environ.get("CLOPHFIT_EMCEE_WORKERS", "4")),
    thin=10,
    nwalkers=30,
    progress=False,
    is_weighted=True,
)

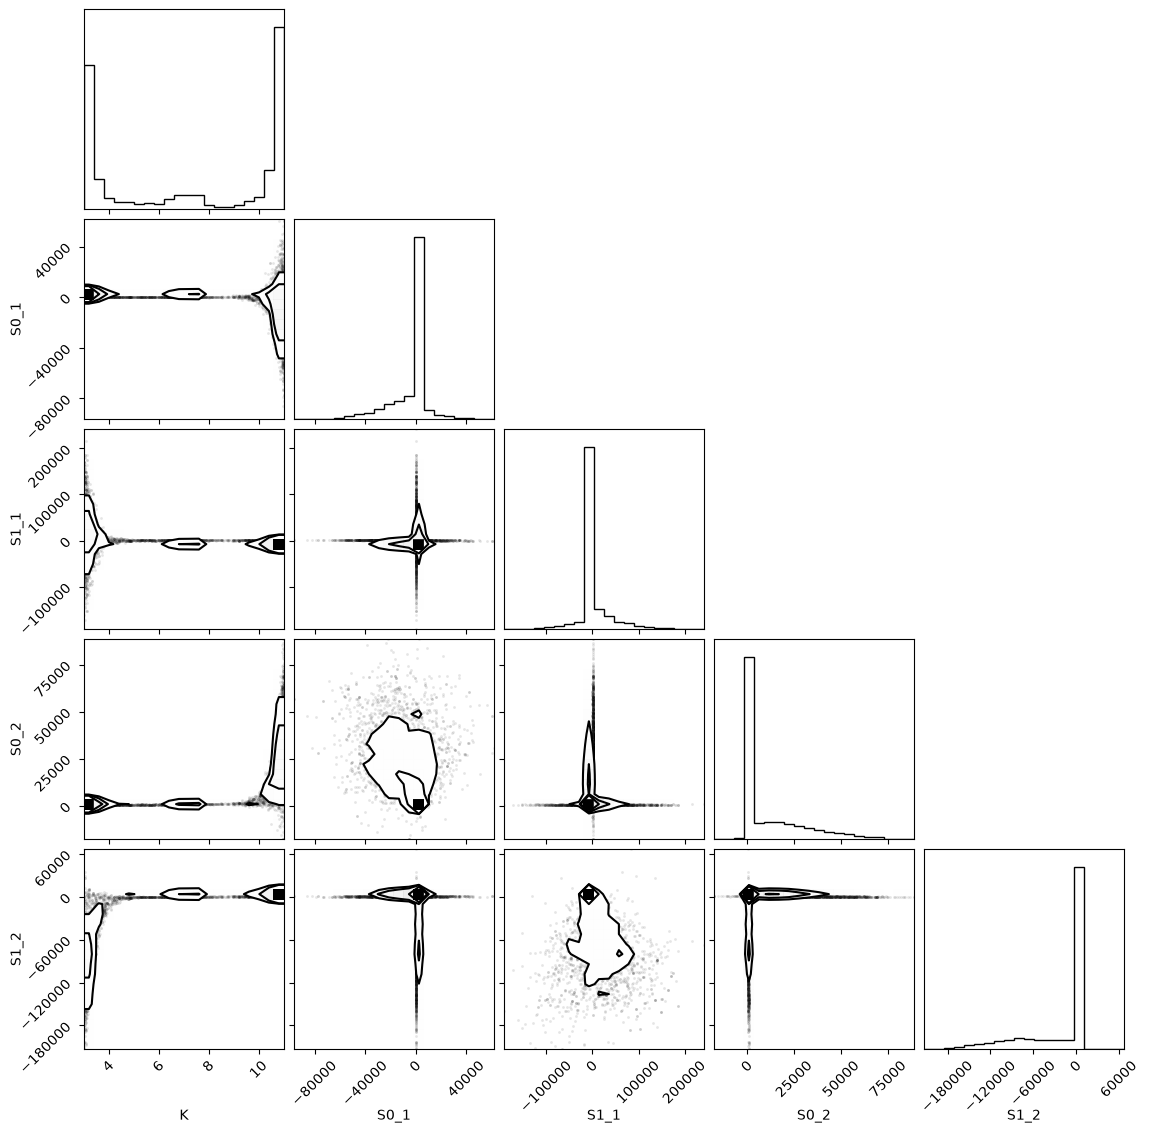
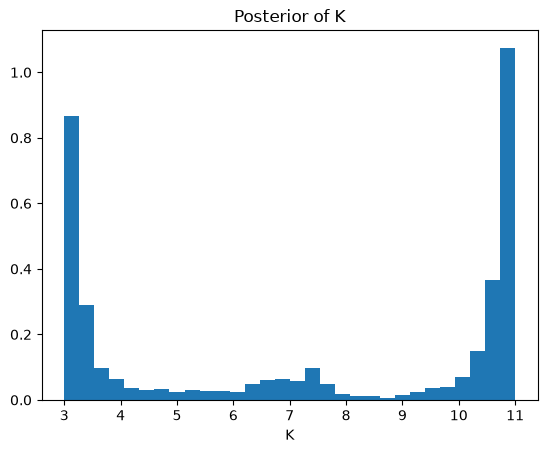
f = plotting.plot_emcee(remcee.flatchain)
print(remcee.flatchain.quantile([0.03, 0.97])["K"].to_list())
WARNING:root:Pandas support in corner is deprecated; use ArviZ directly
WARNING:root:Too few points to create valid contours
WARNING:root:Too few points to create valid contours
WARNING:root:Too few points to create valid contours
The chain is shorter than 50 times the integrated autocorrelation time for 5 parameter(s). Use this estimate with caution and run a longer chain!
N/50 = 40;
tau: [206.38062395 113.97071635  92.35685352 137.18588609 161.70371322]
WARNING:root:Too few points to create valid contours
WARNING:root:Too few points to create valid contours
[3.01865989622107, 10.984728618615785]
samples_dict = {
    col: remcee.flatchain[col].to_numpy()[np.newaxis, :]  # (1 chain, 5700 draws)
    for col in remcee.flatchain
}
idata = az.from_dict({"posterior": samples_dict})

# percentile on K
k_samples = idata.posterior["K"].to_numpy().flatten()
percentile_value = np.percentile(k_samples, 3)
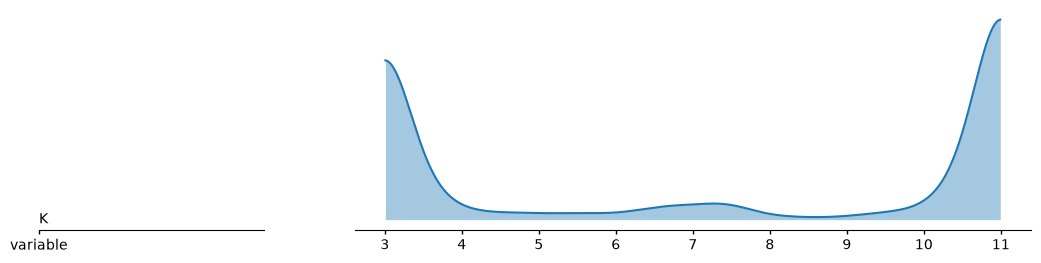
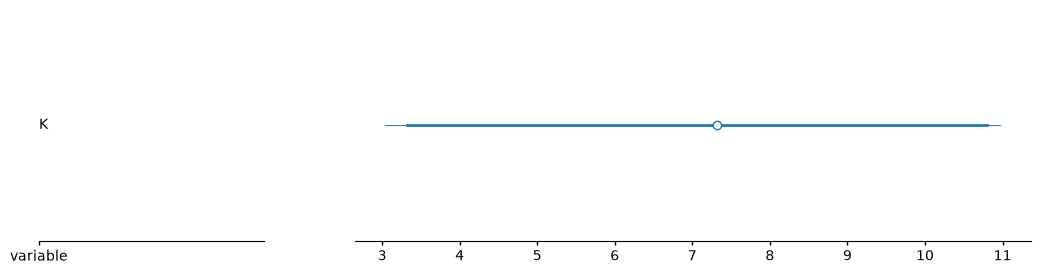
print(f"Value at which the probability of being higher is 99%: {percentile_value:.4f}")

az.plot_ridge(idata, var_names="K")
az.plot_forest(idata, var_names="K")
Value at which the probability of being higher is 99%: 3.0187
<arviz_plots.plot_collection.PlotCollection at 0x7f78a1316490>
samples = remcee.flatchain[["K"]]
k_samples = samples["K"].to_numpy()
percentile_value = np.percentile(k_samples, 3)
print(f"Value at which the probability of being higher is 99%: {percentile_value}")

plt.hist(k_samples, bins=30, density=True)
plt.xlabel("K")
plt.title("Posterior of K")
Value at which the probability of being higher is 99%: 3.01865989622107
Text(0.5, 1.0, 'Posterior of K')
2.8.2. Combining#
# Computed automatically earlier
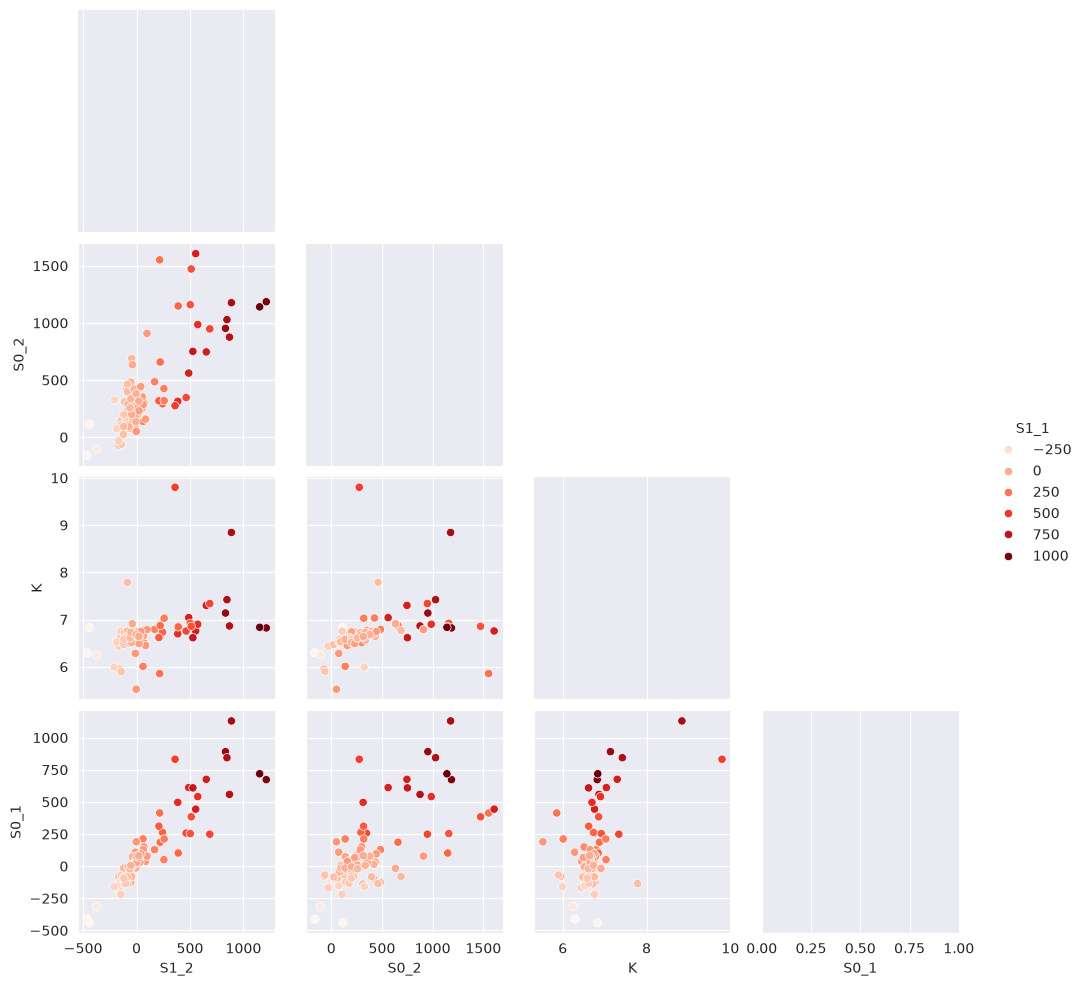
with sns.axes_style("darkgrid"):
    g = sns.pairplot(
        tr_glob.dataframe[["S1_2", "S0_2", "K", "S1_1", "S0_1"]],
        hue="S1_1",
        palette="Reds",
        corner=True,
        diag_kind="kde",
    )
df_ctr = tr1.dataframe
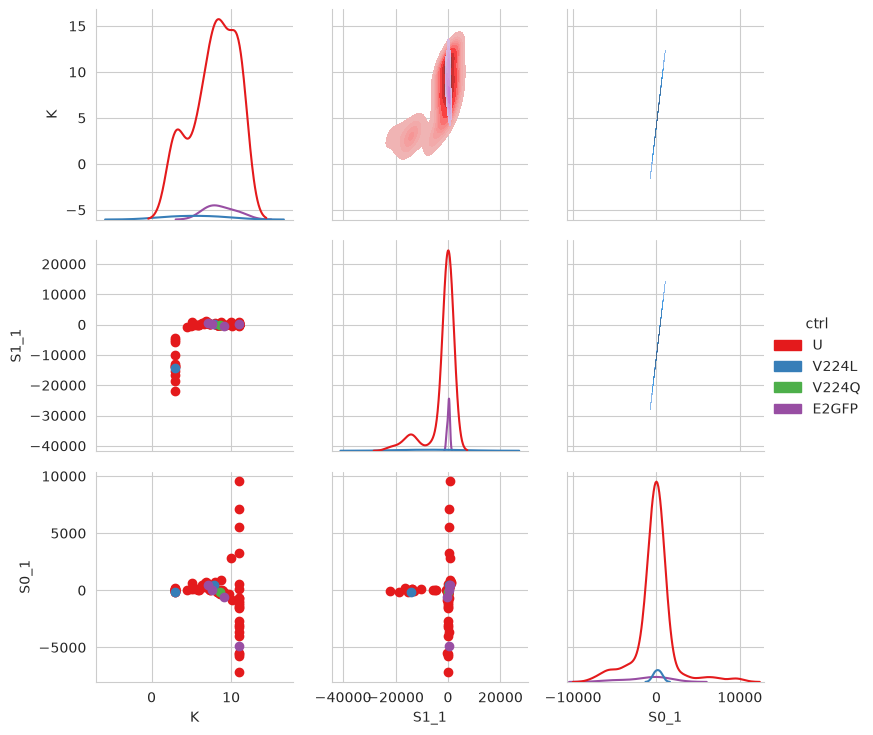
for name, wells in tit.scheme.names.items():
    for well in wells:
        df_ctr.loc[well, "ctrl"] = name

df_ctr.loc[df_ctr["ctrl"].isna(), "ctrl"] = "U"

sns.set_style("whitegrid")
g = sns.PairGrid(
    df_ctr,
    x_vars=["K", "S1_1", "S0_1"],
    y_vars=["K", "S1_1", "S0_1"],
    hue="ctrl",
    palette="Set1",
    diag_sharey=False,
)
g.map_lower(plt.scatter)
g.map_upper(sns.kdeplot, fill=True)
g.map_diag(sns.kdeplot)
g.add_legend()
/home/runner/work/ClopHfit/ClopHfit/.venv/lib/python3.14/site-packages/seaborn/axisgrid.py:1615: UserWarning: KDE cannot be estimated (0 variance or perfect covariance). Pass `warn_singular=False` to disable this warning.
  func(x=x, y=y, **kwargs)
/home/runner/work/ClopHfit/ClopHfit/.venv/lib/python3.14/site-packages/seaborn/axisgrid.py:1615: UserWarning: KDE cannot be estimated (0 variance or perfect covariance). Pass `warn_singular=False` to disable this warning.
  func(x=x, y=y, **kwargs)
/home/runner/work/ClopHfit/ClopHfit/.venv/lib/python3.14/site-packages/seaborn/axisgrid.py:1615: UserWarning: KDE cannot be estimated (0 variance or perfect covariance). Pass `warn_singular=False` to disable this warning.
  func(x=x, y=y, **kwargs)
/home/runner/work/ClopHfit/ClopHfit/.venv/lib/python3.14/site-packages/seaborn/axisgrid.py:1615: UserWarning: KDE cannot be estimated (0 variance or perfect covariance). Pass `warn_singular=False` to disable this warning.
  func(x=x, y=y, **kwargs)
/home/runner/work/ClopHfit/ClopHfit/.venv/lib/python3.14/site-packages/seaborn/axisgrid.py:1513: UserWarning: Dataset has 0 variance; skipping density estimate. Pass `warn_singular=False` to disable this warning.
  func(x=vector, **plot_kwargs)
/home/runner/work/ClopHfit/ClopHfit/.venv/lib/python3.14/site-packages/seaborn/axisgrid.py:1513: UserWarning: Dataset has 0 variance; skipping density estimate. Pass `warn_singular=False` to disable this warning.
  func(x=vector, **plot_kwargs)
/home/runner/work/ClopHfit/ClopHfit/.venv/lib/python3.14/site-packages/seaborn/axisgrid.py:1513: UserWarning: Dataset has 0 variance; skipping density estimate. Pass `warn_singular=False` to disable this warning.
  func(x=vector, **plot_kwargs)
<seaborn.axisgrid.PairGrid at 0x7f78a0775d10>
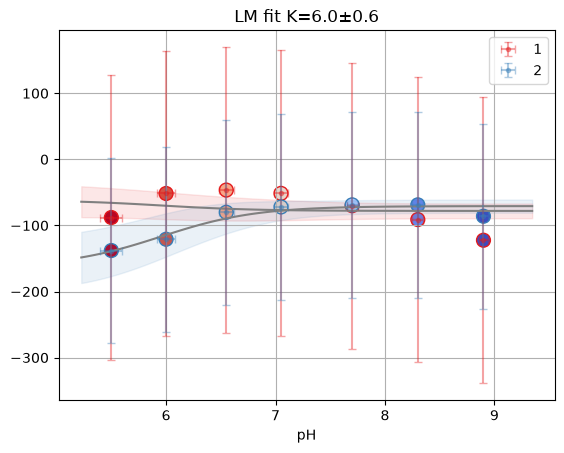
tr_glob["A04"].figure
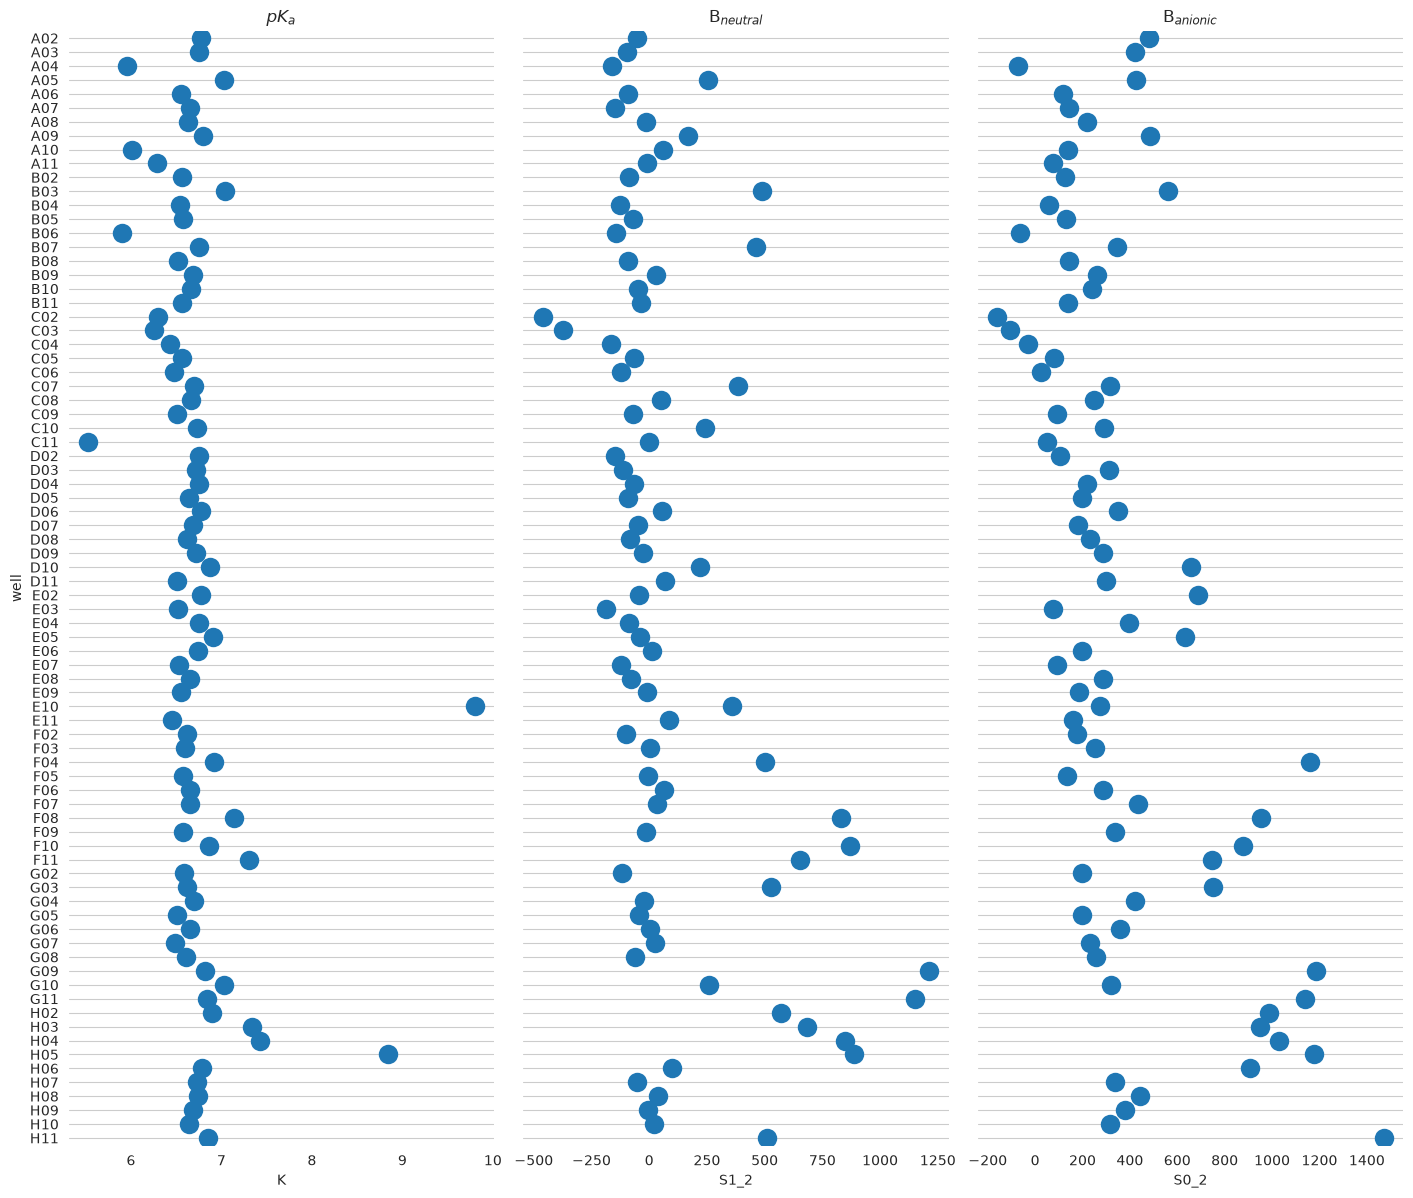
keys_unk = tit.fit_keys - set(tit.scheme.ctrl)
res_unk = tr_glob.dataframe.loc[list(keys_unk)].sort_index()
res_unk["well"] = res_unk.index

f = plt.figure(figsize=(24, 14))
# Make the PairGrida
g = sns.PairGrid(
    res_unk,
    x_vars=["K", "S1_2", "S0_2"],
    y_vars="well",
    height=12,
    aspect=0.4,
)
# Draw a dot plot using the stripplot function
g.map(sns.stripplot, size=14, orient="h", palette="Set2", edgecolor="auto")

# Use the same x axis limits on all columns and add better labels
# g.set(xlim=(0, 25), xlabel="Crashes", ylabel="")

# Use semantically meaningful titles for the columns
titles = ["$pK_a$", "B$_{neutral}$", "B$_{anionic}$"]

for ax, title in zip(g.axes.flat, titles, strict=False):
    # Set a different title for each axes
    ax.set(title=title)

    # Make the grid horizontal instead of vertical
    ax.xaxis.grid(visible=False)
    ax.yaxis.grid(visible=True)

sns.despine(left=True, bottom=True)
<Figure size 2400x1400 with 0 Axes>
2.9. Background method comparison#
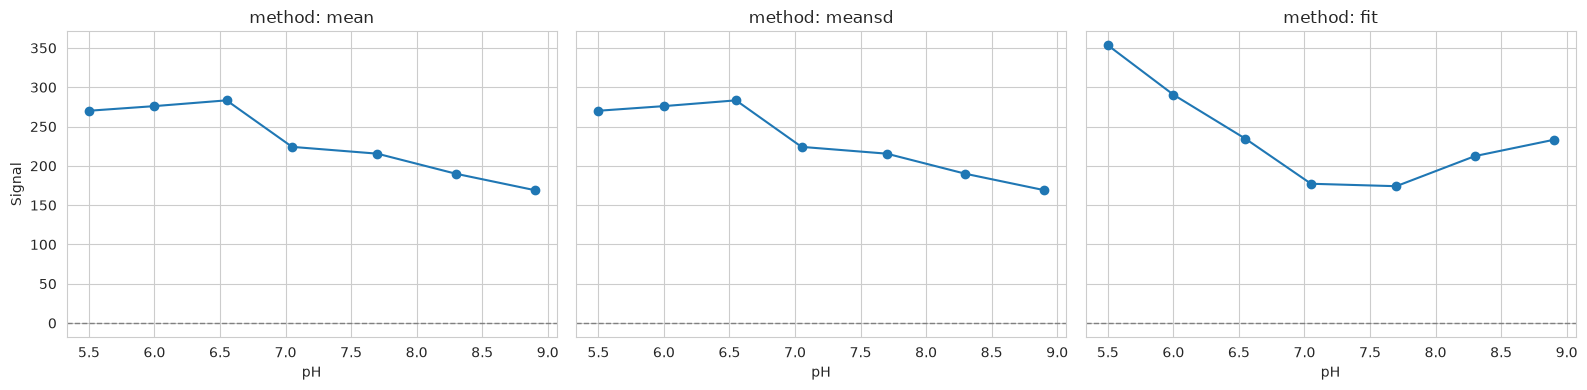
Different background methods may slightly shift baselines; inspect the impact on a single well.
methods = ["mean", "meansd", "fit"]
well = "D10"
fig, axes = plt.subplots(1, len(methods), figsize=(16, 4), sharey=True)
for ax, method in zip(axes, methods, strict=False):
    tit.params.bg_mth = method
    ax.plot(tit.x, tit.data["1"][well], "o-", label=method)
    ax.axhline(0, color="gray", ls="--", lw=1)
    ax.set_title(f"method: {method}")
    ax.set_xlabel("pH")
axes[0].set_ylabel("Signal")
plt.tight_layout()
You can decide how to pre-process data with datafit_params:
[bg] subtract background
[dil] apply correction for dilution (when e.g. during a titration you add titrant without protein)
[nrm] normalize for gain, number of flashes and integration time.
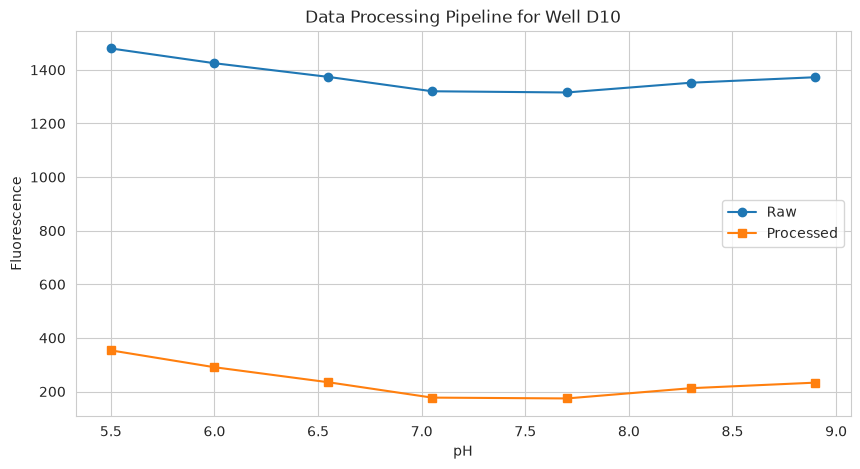
# 3.1 Accessing processed data
well = "D10"
data = {
    "pH": tit.x,
    "Signal (raw)": tit.labelblocksgroups["1"].data_nrm[well],
    "Signal (processed)": tit.data["1"][well],
}

plt.figure(figsize=(10, 5))
plt.plot(data["pH"], data["Signal (raw)"], "o-", label="Raw")
plt.plot(data["pH"], data["Signal (processed)"], "s-", label="Processed")
plt.xlabel("pH")
plt.ylabel("Fluorescence")
plt.title(f"Data Processing Pipeline for Well {well}")
plt.legend()
plt.grid(visible=True)
2.10. Cl titration analysis#
cl_an = prtecan.Titration.fromlistfile(l2_dir / "list.cl.csv", is_ph=False)
cl_an.load_scheme(l2_dir / "scheme.txt")
cl_an.scheme
WARNING:clophfit.prtecan.models: OVER value in Label1: H02 of tecanfile ../../tests/Tecan/140220/pH5.0_200214.xls
PlateScheme(file=PosixPath('../../tests/Tecan/140220/scheme.txt'), _buffer=['D01', 'E01', 'D12', 'E12'], _discard=[], _ctrl=['H01', 'C12', 'B01', 'F12', 'A01', 'F01', 'H12', 'G12', 'B12', 'G01', 'C01', 'A12'], _names={'G03': {'A01', 'B12', 'H12'}, 'NTT': {'F01', 'C12', 'F12'}, 'S202N': {'H01', 'C01', 'G12'}, 'V224Q': {'A12', 'G01', 'B01'}})
from clophfit import prtecan

cl_an.load_additions(l2_dir / "additions.cl")
print(cl_an.x)
cl_an.x = prtecan.calculate_conc(cl_an.additions, 1000)
cl_an.x
[0. 0. 0. 0. 0. 0. 0. 0. 0.]
array([  0.        ,  17.54385965,  34.48275862,  50.84745763,
        66.66666667,  81.96721311,  96.77419355, 138.46153846,
       164.17910448])
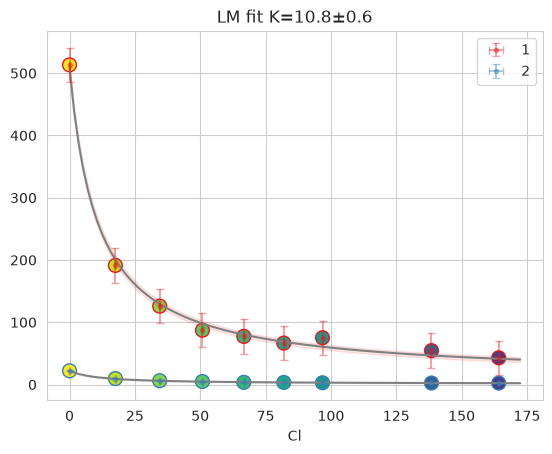
tr_glob_cl = cl_an.fit_plate(method="lm")
fres = tr_glob_cl["D10"]
print(fres.is_valid(), fres.result.bic, fres.result.redchi)
fres.figure
True -34.533521922742366 0.0910826776686997
2.11. Batch export (optional)#
You can export processed data and fit results using TecanConfig.
Note: adjust paths and toggles (png, fit, comb) as needed.
tit.params
TitrationConfig(bg=True, bg_adj=False, dil=True, nrm=True, bg_mth='fit', fit_method='huber', outlier=None, noise_alpha=(), noise_gain=(), mask_outliers=False, outlier_threshold=0.2)
tit.params.bg_mth = "meansd"
tit.params.mcmc = None
# Fits are computed via fit_plate now
from tempfile import mkdtemp

from clophfit.prtecan.export import export_data_fit

out_dir = Path(mkdtemp())
conf = prtecan.TecanConfig(
    out_fp=out_dir, comb=False, lim=None, title="FullAnalysis", fit=True, png=True
)
export_data_fit(tit, conf)
print("Exported to:", out_dir)
# list(out_dir.glob('*'))[:10]
# print("Contents:", *[f.name for f in output_dir.glob("*")], sep="\n- ")
Exported to: /tmp/tmpfpjho7o3